Moldflow Monday Blog

How to use the Center Line feature in Moldflow Insight!

How to use the Center Line feature in Moldflow Insight!

I remember exactly when the Center Line feature came out in Moldflow Insight. The first time I used this feature, I saved almost 4 hours of cooling modeling.
 
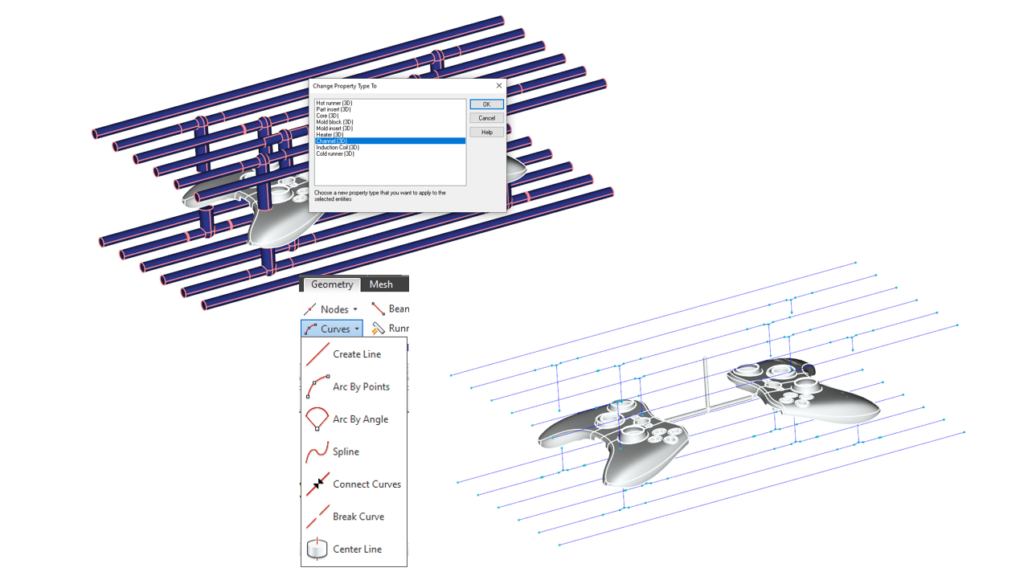
If you Import 3D CAD of your cooling lines (or a 3D solid of the mold plate) you can first set your mesh type to 3D. Next, you need to right-click on the cooling channel bodies and change the property to Channel 3D. Finally, go to Geometry – Curves – Center Line and click Apply.
 
This will take your 3D geometry and convert it into simple curves. Fun fact – since it has the CAD to start it will also assign the correct diameters to your cooling channels.
 
You will still have to assign baffle and bubbler properties since this will turn everything into channels. You may also have to clean up some vertices depending on the cleanliness of your CAD model. 
 
Have you used the Center Line feature in Moldflow Insight?

There is a component for which you can choose to change the property type to apply to the selected entities. But you can also edit the geometry and mesh.

Für mehr News und weitere Themen rund um Spritzgießsimulation, folgen Sie MFS und Mason Myers auf LinkedIn.

Previous Post
How to determine your tool shrinkage
Next Post
How to determine your gate locations in Moldflow?

Weitere interessante Beiträge

Sehen Sie sich unser Schulungsangebot an, von der Ergebnisinterpretation
bis hin zur Softwarebedienung in Moldflow & Fusion 360

The MF ACADEMY logo showcases the letters MFA intertwined with an educational hat, symbolizing excellence in training and expertise. This logo represents MF SOFTWARE's commitment to providing comprehensive programs in injection molding, Moldflow, and Fusion 360. Unleash your potential with MF ACADEMY's top-notch educational offerings.

Lernen Sie die Plastic Engineering Group kennen
– unser Ingenieurbüro für Spritzgieß- und Mechaniksimulationen