Moldflow Monday Blog

How do you create inserts in Moldflow?

How do you create inserts in Moldflow?

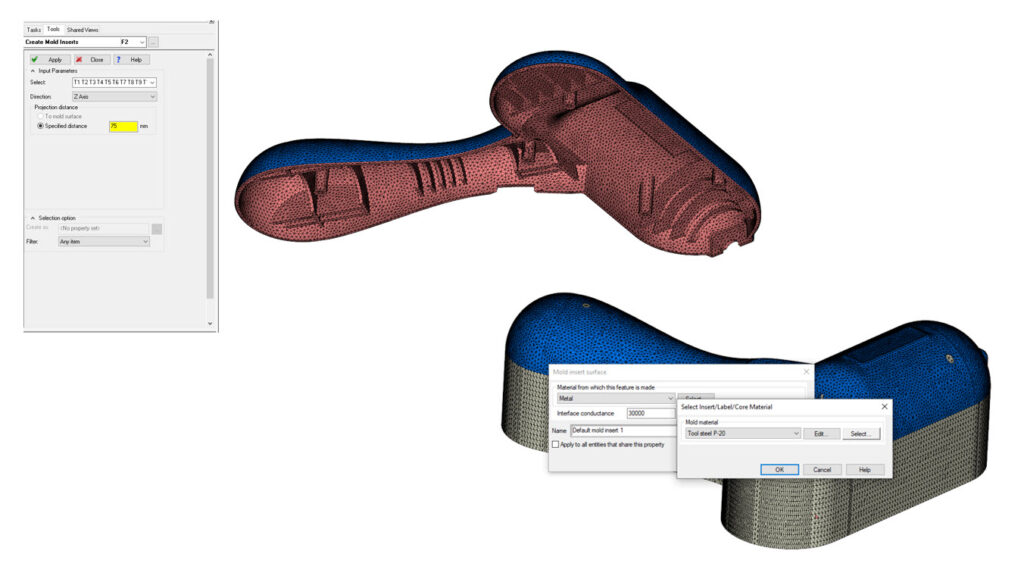
Did you know that you can create mold inserts within Moldflow Insight?
 
Creating inserts in Moldflow is easier if you first start with a Dual Domain part mesh. You can select an element on the cavity side – Expand to Triangles on the Same Surface – then Invert the Selection to grab all the triangles on the core side. You can then go to Geometry – Create – Inserts. Select the direction and distance for your insert and don’t forget to change the mold material and conductance from the default P-20/30,000 W/m2C.
 
If you are using a 3D mesh – you can switch to a 3D mesh and use the Generate Mesh/Mold Mesh options to mesh both the part and insert to 3D tetras.
 
While you can also import CAD or change the mold material by selecting a part element, creating inserts in Moldflow Insight can be easy!
 
How do you create inserts in Moldflow?
Für mehr News und weitere Themen rund um Spritzgießsimulation, folgen Sie MFS und Mason Myers auf LinkedIn.

Previous Post
Wie erstellt man Einlegeteile in Moldflow?
Next Post
How to use the Command Line in Moldflow Insight?

Weitere interessante Beiträge

Sehen Sie sich unser Schulungsangebot an, von der Ergebnisinterpretation
bis hin zur Softwarebedienung in Moldflow & Fusion 360

The MF ACADEMY logo showcases the letters MFA intertwined with an educational hat, symbolizing excellence in training and expertise. This logo represents MF SOFTWARE's commitment to providing comprehensive programs in injection molding, Moldflow, and Fusion 360. Unleash your potential with MF ACADEMY's top-notch educational offerings.

Lernen Sie die Plastic Engineering Group kennen
– unser Ingenieurbüro für Spritzgieß- und Mechaniksimulationen