Moldflow Monday Blog

How to use anchor points/planes in Moldflow Insight?

How to use anchor points/planes in Moldflow Insight?

Anchors are an important aspect of evaluating Deflection results from Moldflow. You can either choose to assign a single Anchor Point (Results – Warpage – Anchors – select a point on the model or enter a node number) or you can use 3 anchor points to define your Anchor Plane. I never use just 2 anchor points.
 
Order of operation is important with Anchor Planes. The first point selected is the new origin, the second point defines the X direction and the 3rd point defines your plane and your Y direction. It can be helpful if the global coordinate matches that of your anchor plane coordinate, simply for your sanity.
 
I use anchor points/planes when determining the cause of warpage, matching my customer’s GD&T, as well as matching my customer’s fixtures they use to measure warp on molded parts.
 
How do you use anchor points/planes in Moldflow Insight?
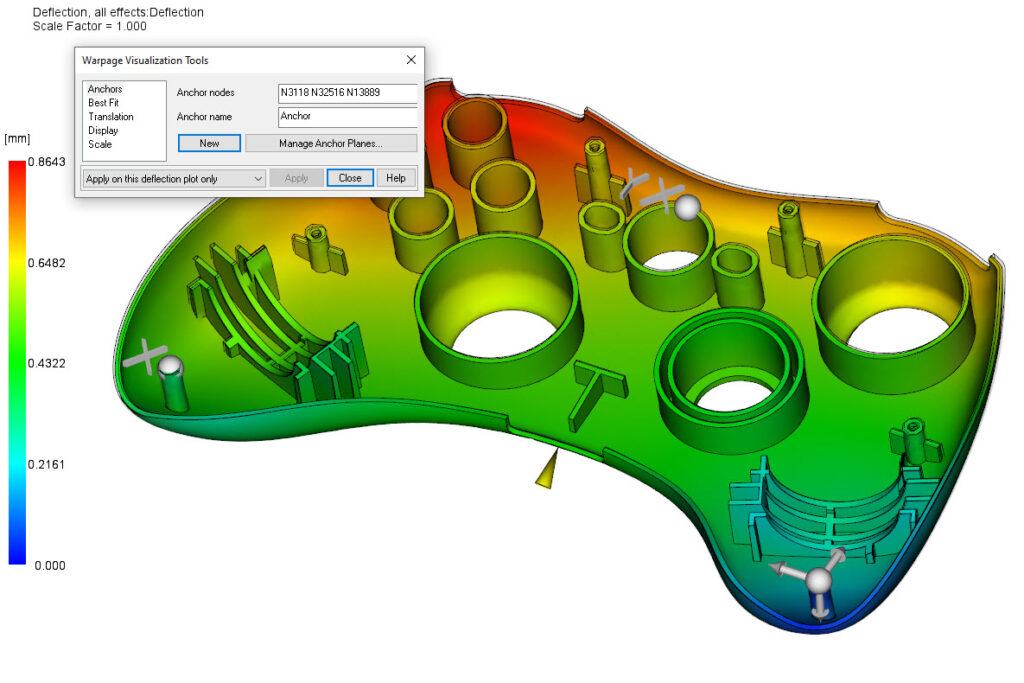
You can see a component with an open window showing the warpage visualization tools.

Für mehr News und weitere Themen rund um Spritzgießsimulation, folgen Sie MFS und Mason Myers auf LinkedIn.

Previous Post
Sollten wir Fill+Pack+Warp (FPW) oder Cool+FPW (CFPW) einsetzen?
Next Post
Wie verwendet man Verankerungspunkte/-ebenen in Moldflow Insight?

Weitere interessante Beiträge

Sehen Sie sich unser Schulungsangebot an, von der Ergebnisinterpretation
bis hin zur Softwarebedienung in Moldflow & Fusion 360

The MF ACADEMY logo showcases the letters MFA intertwined with an educational hat, symbolizing excellence in training and expertise. This logo represents MF SOFTWARE's commitment to providing comprehensive programs in injection molding, Moldflow, and Fusion 360. Unleash your potential with MF ACADEMY's top-notch educational offerings.

Lernen Sie die Plastic Engineering Group kennen
– unser Ingenieurbüro für Spritzgieß- und Mechaniksimulationen